You’ll need:
- A free Microsoft account
- Access to the Internet
- Disk space
- Administration privileges on your computer
My setup is a home desktop PC with a 1 TB data drive. I’d recommend having at least 50 GB free, but you could follow this tutorial with only 20 GB free.
Here are the downloads you’ll need (links available as of 12/12/2016):
SQL Server 2016 Developer Edition
- To access SQL Server 2016 Dev Edition, you will need to sign up for a free Visual Studio Dev Essentials membership. This is a perpetual free membership for the email account you used to sign up.
Windows Server 2016 from Microsoft Evaluation Center
- Pick file type of ISO
Virtual Box or virtualization technology of your choice.
Please start all the above downloads while you read the instructions below. To install Windows Server 2016 on Virtual Box, you will need to enter your computer’s BIOS and turn on 64 bit virtualization. This setting might be called something else on your PC.
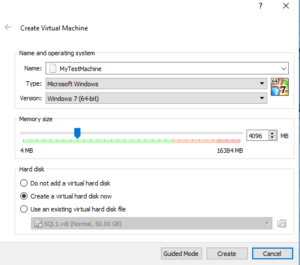
To begin your installations, install Virtual Box and start a new Virtual Machine (VM) by pressing the blue circle labelled “New”. You must pick a VM type of Microsoft Windows and the version must state 64 bit. I usually pick about 4096 MB of Memory because my PC has 16 GB. Pick at least 512 MB memory for your VM or it may not have enough memory.

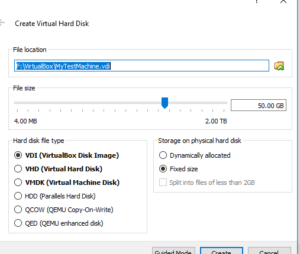
Hit the “Create” button. On the next screen, the prompt is asking to select the size of the hard drive. I picked my data drive, F, and allocated a fixed size of 50 GB. Then hit Create again.
Your next step is to install Windows Server 2016. Virtual box will prompt you to select your ISO file. Browse on your PC to where you downloaded Windows Server. Install Windows Server 2016 normally. The only important part is to make sure that you choose the version of Windows Server that has a GUI. In Windows 2016, the desktop experience is no longer a default option. If you don’t do this, when you boot your VM, you will not see the normal desktop.
From now, we will be using the VM with Windows Server installed. To make life easier, I recommend installing an ISO that came with your Virtual Box setup files. There’s an ISO called VBoxGuestAdditions that will allow you to map a shared network drive between your VM and your PC, once you install it. Install this and map a shared drive (Devices->Shared Folders->Shared Folder Settings), so that you can transfer files back and forth between VM and PC. You can map any ISO to your Virtual Box by selecting Devices->Optical Drives->Choose Disk Image… and then picking an ISO file on your PC.
With Windows Server installed, we still need to install SQL Server 2016 Developer Edition and SQL Server Management Studio (SSMS). The order that you install these applications doesn’t matter. To install SSMS, place the .exe that you downloaded from earlier into a shared drive that you’ve mapped. I won’t cover the process of installing SQL Server in this blog post, but the bare minimum option you need is the SQL Server Engine install. Once you have installed these two, you’ll have a functional SQL Server available in this VM.
To close your VM, you can either pick Save machine state or Power off the machine. I like to save the machine state since then I can resume where I was in my VM. Power down is just shutting down the machine.
